Sada Budov: Rozdiel medzi revíziami
| Riadok 29: | Riadok 29: | ||
Príklad prepojenia sady budov: | Príklad prepojenia sady budov: | ||
[[File:connexion1.png|left|325px]] [[File:connexion2.png|center|370px]] | [[File:connexion1.png|left|325px]] [[File:connexion2.png|center|370px]] | ||
===Building Sets Overview=== | |||
A Building Set is composed of a certain number of buildings. Any unique Set Building can only belong to one Building Set. Build them right next to each other to unlock their true potential! The more unique Set Buildings you build next to each other, the higher their bonus will be! | |||
To view a bigger image, click on the building picture. | |||
{| style="text-align: center" class="mw-collapsible mw-collapsed" | |||
!colspan="11"|Three Glacier Giants Building Set | |||
|- | |||
|Building | |||
|colspan="1"|Size | |||
|colspan="1"|Benefits | |||
|colspan="1"|Set Bonus | |||
|- | |||
|[[File:IceMountainTroll.png|80px|Ice Mountain Troll]] | |||
|5x4 | |||
|[[File:Coin_small.png|30px|Coins]] | |||
|[[File:Supply_small.png|30px|Supplies]] ----- [[File:Coin_small.png|30px|Coins]] ----- [[File:Kpicon.png|30px|Knowledge Point]] | |||
|- | |||
|[[File:OrcVortex.png|80px|Orc Vortex]] | |||
|2x4 | |||
|[[File:Supply_small.png|30px|Supplies]] or [[File:Orcs.png|30px|Orcs]] | |||
|[[File:Supply_small.png|30px|Supplies]] ----- [[File:Supply_small.png|30px|Supplies]] ----- [[File:Supply_small.png|30px|Supplies]] | |||
or | |||
[[File:Orcs.png|30px|Orcs]] ----- [[File:Orcs.png|30px|Orcs]] ----- [[File:Orcs.png|30px|Orcs]] | |||
|- | |||
|[[File:GiantsHand.png|80px|Giants Hand]] | |||
|4x3 | |||
|[[File:Gds1p1.png|Basic Goods]] | |||
|[[File:Gds1p1.png|30px|Basic Goods]] ----- [[File:Gds1p2.png|30px|Basic Goods]] ----- [[File:Gds1.png|30px|Basic Goods]] | |||
|- | |||
|[[File:FrozenFountain.png|80px|Frozen Fountain]] | |||
|2x3 | |||
|[[File:Supply_small.png|30px|Supplies]] or [[File:Mana.png|30px|Mana]] | |||
|[[File:Supply_small.png|30px|Supplies]] ----- [[File:Supply_small.png|30px|Supplies]] ----- [[File:Supply_small.png|30px|Supplies]] | |||
or | |||
[[File:Mana.png|30px|Mana]] ----- [[File:Mana.png|30px|Mana]] ----- [[File:Mana.png|30px|Mana]] | |||
|- | |||
|} | |||
<br> | |||
{| style="text-align: center" class="mw-collapsible mw-collapsed" | |||
!colspan="11"|The Phoenix Cult Building Set | |||
|- | |||
|Building | |||
|colspan="1"|Size | |||
|colspan="1"|Benefits | |||
|colspan="1"|Set Bonus | |||
|- | |||
|[[File:Easter_Pond.png|80px|Cultist's Plaza]] | |||
|2x3 | |||
|[[File:Gds1p2.png|25px|Basic Goods]] | |||
|[[File:Good_marble_small.png|25px|Marble]] ----- [[File:Good_steel_small.png|25px|Steel]] ----- [[File:Good_planks_small.png|25px|Planks]] ----- [[File:Gds1p2.png|25px|Basic Goods]] | |||
|- | |||
|[[File:Phoenix_gong.png|80px|Phoenix Worship]] | |||
|3x5 | |||
|[[File:Gds2p2.png|25px|Crafted Goods]] | |||
|[[File:Good_crystal_small.png|25px|Crystal]] ----- [[File:Good_scrolls_small.png|25px|Scrolls]] ----- [[File:Good_silk_small.png|25px|Silk]] ---- [[File:Kpicon.png|25px|Knowledge Point]] | |||
|- | |||
|[[File:Phoenix_temple.png|80px|Temple of Phoenix]] | |||
|5x3 | |||
|[[File:Gds3p2.png|25px|Magical Goods]] | |||
|[[File:Good_elixir_small.png|25px|Elixir]] ----- [[File:Good_magic_dust_small.png|25px|Magic Dust]] ----- [[File:Good_gems_small.png|25px|Gems]] ---- [[File:Brokenshard.png|25px|Broken Shard Production]] | |||
|- | |||
|[[File:SpringPavillon_Set.png|80px|Phoenix Pavillon]] | |||
|2x3 | |||
|[[File:Supply_small.png|25px|Supplies]] | |||
|[[File:Supply_small.png|25px|Supplies]] ----- [[File:Supply_small.png|25px|Supplies]] ----- [[File:Supply_small.png|25px|Supplies]] ---- [[File:Supply_small.png|25px|Supplies]] | |||
|- | |||
|[[File:Lighthouse_Set.png|80px|Phoenix Lighthouse]] | |||
|2x2 | |||
|[[File:Coin_small.png|25px|Coins]] | |||
|[[File:Coin_small.png|25px|Coins]] ----- [[File:Coin_small.png|25px|Coins]] ----- [[File:Coin_small.png|25px|Coins]] ---- [[File:Coin_small.png|25px|Coins]] | |||
|- | |||
|} | |||
<br> | |||
{| style="text-align: center" class="mw-collapsible mw-collapsed" | |||
!colspan="11"|The Woodelvenstock Building Set | |||
|- | |||
|Building | |||
|colspan="1"|Size | |||
|colspan="1"|Benefits | |||
|colspan="1"|Set Bonus | |||
|- | |||
|[[File:Event_Sum_Set_2x2_0000.png|80px|IVIP Lounge]] | |||
|2x2 | |||
|[[File:Population_small_elves.png|25px|Population]] and [[File:Coin_small.png|30px|Coins]] | |||
|[[File:Coin_small.png|30px|Coins]] ---- [[File:Coin_small.png|30px|Coins]] ---- [[File:Supply_small.png|30px|Supplies]] ----- [[File:Supply_small.png|30px|Supplies]] | |||
|- | |||
|[[File:Event_Sum_Set_3x1_0000.png|80px|Lindworm Area]] | |||
|3x1 | |||
|[[File:Gds3p2.png|30px|Magical Goods]]<br>or [[File:Mana.png |30px|Mana]] | |||
|[[File:Gds3p2.png|30px|Magical Goods]] ----- [[File:Gds3p2.png|30px|Magical Goods]] -----[[File:Gds3p2.png|30px|Magical Goods]] ----- [[File:Gds3p2.png|30px|Magical Goods]]<br> or [[File:Mana.png|30px|Mana]] ----- [[File:Mana.png|30px|Mana]] ----- [[File:Mana.png|30px|Mana]] ---- [[File:Mana.png|30px|Mana]] | |||
|- | |||
|[[File:Event_Sum_Set_3x4_01_0022.png|80px|Main Stage]] | |||
|3x4 | |||
|[[File:Population_small_elves.png|25px|Population]] and [[File:Supply_small.png|25px|Supplies]]<br>or [[File:Gds3p2.png|30px|Magical Goods]]<br>or [[File:Mana.png|30px|Mana]]<br>or [[File:Seed_icon.png |30px|Divine Seeds]] | |||
|[[File:Supply_small.png|25px|Supplies]] ----- [[File:Supply_small.png|25px|Supplies]] ----- [[File:Supply_small.png|25px|Supplies]] ----- [[File:Kpicon.png|30px|Knowledge Points]]<br> or [[File:Gds3p2.png|30px|Magical Goods]] ----- [[File:Gds3p2.png|30px|Magical Goods]] ----- [[File:Gds3p2.png|30px|Magical Goods]] ----- [[File:Kpicon.png|30px|Knowledge Points]]<br>or [[File:Mana.png|30px|Mana]] ----- [[File:Mana.png|30px|Mana]] ----- [[File:Mana.png|30px|Mana]] ----- [[File:Kpicon.png|30px|Knowledge Points]]<br>or [[File:Seed_icon.png|30px|Divine Seeds]] ----- [[File:Seed_icon.png|30px|Divine Seeds]] ----- [[File:Seed_icon.png|30px|Divine Seeds]] ----- [[File:Kpicon.png|30px|Knowledge Points]] | |||
|- | |||
|[[File:Event_Sum_Set_2x3_0000.png|80px|Mosh Pit]] | |||
|2x3 | |||
|[[File:Population_small_elves.png|25px|Population]] and [[File:Gds3p2.png|30px|Magical Goods]] | |||
|[[File:Gds3p2.png|30px|Magical Goods]] ----- [[File:Gds3p2.png|30px|Magical Goods]] ----- [[File:Gds3p2.png|30px|Magical Goods]] ---- [[File:Gds3p2.png|30px|Magical Goods]] | |||
|- | |||
|[[File:Event_Sum_3x3_03_0000.png|80px|Dancing Ground]] | |||
|3x3 | |||
|[[File:Gds3p2.png|30px|Magical Goods]] | |||
|[[File:Gds3p2.png|30px|Magical Goods]] ----- [[File:Gds3p2.png|30px|Magical Goods]] ----- [[File:Gds3p2.png|30px|Magical Goods]] ---- [[File:Gds3p2.png|30px|Magical Goods]] | |||
|} | |||
<br> | |||
{| style="text-align: center" class="mw-collapsible mw-collapsed" | |||
!colspan="4"|The Harvest Festival Building Set 1 and 2 | |||
|- | |||
|colspan="4" style="text-align:center" |[[File:SummerSet2018_1.png|650px|Harvest Temple Set]] | |||
Set 1: Harvest Temple | |||
|- | |||
|colspan="1"|Building | |||
|colspan="1"|Size | |||
|colspan="1"|Benefits | |||
|colspan="1"|Set Bonus | |||
|- | |||
|[[File:Event_Aut_Set_2x6_02_0000.png|150px|Sun Temple Complex]] | |||
|2x6 | |||
|[[File:Population_small_elves.png|25px|Population]] and [[File:Coin_small.png|30px|Coins]] | |||
|[[File:Coin_small.png|30px|Coins]] ---- [[File:Coin_small.png|30px|Coins]] ---- [[File:Coin_small.png|30px|Coins]] ----- [[File:Coin_small.png|30px|Coins]] | |||
|- | |||
|[[File:Event_Aut_Set_2x6_01_0000.png|150px|Moon Temple Complex]] | |||
|2x6 | |||
|[[File:Population_small_elves.png|25px|Population]] and [[File:Supply_small.png|30px|Supplies]] | |||
|[[File:Supply_small.png|30px|Supplies]] ----- [[File:Supply_small.png|30px|Supplies]] ----- [[File:Supply_small.png|30px|Supplies]] ----- [[File:Supply_small.png|30px|Supplies]] | |||
|- | |||
|[[File:Event_Aut_Set_3x1_01.png|100px|Temple Entrance]] | |||
|3x1 | |||
|[[File:Gds1p1.png|30px|Basic Goods]] | |||
|[[File:Gds1p2.png|30px|Basic Goods]] ----- [[File:Gds1.png|30px|Basic Goods]] ----- [[File:Gds1p1.png|30px|Basic Goods]] ----- [[File:Brokenshard.png|30px|Broken Shard]] | |||
|- | |||
|[[File:Event_Aut_Set_3x3_01_0000.png|120px|Cornucopia Sanctuary]] | |||
|3x3 | |||
|[[File:Population_small_elves.png|25px|Population]] and [[File:Gds1p2.png|30px|Basic Goods]] | |||
|[[File:Gds1.png|30px|Basic Goods]] ----- [[File:Gds1p1.png|30px|Basic Goods]] ----- [[File:Gds1p2.png|30px|Basic Goods]] ----- [[File:Kpicon.png|30px|Knowledge Point]] | |||
|- | |||
|[[File:Event_Aut_Set_3x2_01_0000.png|120px|Harvest Storage]] | |||
|3x2 | |||
||[[File:Gds1.png|30px|Basic Goods]] | |||
|[[File:Gds1p1.png|30px|Basic Goods]] ----- [[File:Gds2p2.png|30px|Basic Goods]] ----- [[File:Gds1.png|30px|Basic Goods]] ----- [[File:Brokenshard.png|30px|Broken Shard]] | |||
|- | |||
!colspan="4" | | |||
|- | |||
|colspan="4" style="text-aligh: center" |[[File:SummerSet2018_2.png|600px|Shrines of Sun and Moon Set]] | |||
Set 2: Shrines of Sun and Moon | |||
|- | |||
|colspan="1"|Building | |||
|colspan="1"|Size | |||
|colspan="1"|Benefits | |||
|colspan="1"|Set Bonus | |||
|- | |||
|[[File:Event_Aut_5x3_01_0000.png|120px|Kirit, Weasel God of Night Fruit]] | |||
|5x3 | |||
|[[File:Population_small_elves.png|25px|Population]] and [[File:Gds2p2.png|30px|Crafted Goods]] | |||
|[[File:Gds2p2.png|30px|Crafted Goods]] -----[[File:Gds2p2.png|30px|Crafted Goods]] ----- [[File:Kpicon.png|30px|Knowledge Point]] | |||
|- | |||
|[[File:Event_Aut_4x4_01_0000.png|120px|Krarak, Bird God of Sun Harvest]] | |||
|4x4 | |||
|[[File:Population_small_elves.png|25px|Population]] and [[File:Gds3p2.png|30px|Magical Goods]] | |||
|[[File:Gds3p2.png|30px|Magical Goods]] -----[[File:Gds3p2.png|30px|Magical Goods]] ----- [[File:Kpicon.png|30px|Knowledge Point]] | |||
|- | |||
|[[File:Event_Aut_1x1_01.png|80px|Shrine of Kirit]] | |||
|1x1 | |||
|[[File:Supply_small.png|30px|Supplies]]<br>or [[File:Gds3p1.png|30px|Magical Goods]]<br> or [[File:Mana.png|30px|Mana]] | |||
|[[File:Supply_small.png|30px|Supplies]] ----- [[File:Supply_small.png|30px|Supplies]] ----- [[File:Supply_small.png|30px|Supplies]]<br>or [[File:Gds3p1.png|30px|Magical Goods]] ----- [[File:Gds3p1.png|30px|Magical Goods]] ----- [[File:Gds3p1.png|30px|Magical Goods]]<br>or [[File:Mana.png|30px|Mana]] ----- [[File:Mana.png|30px|Mana]] ----- [[File:Mana.png|30px|Mana]] | |||
|- | |||
|[[File:Event_Aut_1x1_02.png|80px|Shrine of Krarak]] | |||
|1x1 | |||
|[[File:Supply_small.png|30px|Supplies]]<br>or [[File:Gds3p1.png|30px|Magical Goods]]<br> or [[File:Seed_icon.png|30px|Divine Seeds]] | |||
|[[File:Supply_small.png|30px|Supplies]] ----- [[File:Supply_small.png|30px|Supplies]] ----- [[File:Supply_small.png|30px|Supplies]]<br>or [[File:Gds3p1.png|30px|Magical Goods]] ----- [[File:Gds3p1.png|30px|Magical Goods]] ----- [[File:Gds3p1.png|30px|Magical Goods]]<br>or [[File:Seed_icon.png|30px|Divine Seeds]] ----- [[File:Seed_icon.png|30px|Divine Seeds]] ----- [[File:Seed_icon.png|30px|Divine Seeds]] | |||
|- | |||
|} | |||
<br> | |||
{| style="text-align: center" class="mw-collapsible mw-collapsed" | |||
!colspan="4"|The Winter Magic Set 1 and 2 | |||
|- | |||
|colspan="4" style="text-align:center" |[[File:WinterSet2018_1.png|650px|Winter Market Set]] | |||
Set 1: Winter Market Set | |||
|- | |||
|colspan="1"|Building | |||
|colspan="1"|Size | |||
|colspan="1"|Benefits | |||
|colspan="1"|Set Bonus | |||
|- | |||
|[[File:Event_Win_Set_2x3_01_0000.png|150px|Market Stalls]] | |||
|2x3 | |||
|[[File:Culture.png|30px|Culture]] and [[File:Gds1p1.png|30px|Basic Goods]] | |||
|[[File:Gds1p1.png|30px|Basic Goods]] ---- [[File:Gds1p1.png|30px|Basic Goods]] | |||
|- | |||
|[[File:Event_Win_Set1_2x4_01.png|150px|Winter Fair]] | |||
|2x4 | |||
|[[File:Culture.png|30px|Culture]] and [[File:Gds2p1.png|30px|Crafted Goods]] | |||
|[[File:Gds2p1.png|30px|Crafted Goods]] ----- [[File:Gds2p1.png|30px|Crafted Goods]] | |||
|- | |||
|[[File:Event_Win_3x2_Set1_01_0000.png|120px|Elvenade Booth]] | |||
|3x2 | |||
|[[File:Culture.png|30px|Culture]] and [[File:Supply_small.png|30px|Supplies]] | |||
|[[File:Supply_small.png|30px|Supplies]] ----- [[File:Coin_small.png|30px|Coins]] ----- [[File:Supply_small.png|30px|Supplies]] | |||
|- | |||
|[[File:Event_Win_Set1_3x3_01_0000.png|100px|Sled Carousel]] | |||
|3x3 | |||
|[[File:Culture.png|30px|Culture]] and [[File:Gds3p1.png|30px|Magical Goods]] | |||
|[[File:Gds3p1.png|30px|Magical Goods]] ----- [[File:Gds3p1.png|30px|Magical Goods]] ----- [[File:Brokenshard.png|30px|Broken Shard]] | |||
|- | |||
|[[File:Event_Win_Set1_3x6_01_0000.png|120px|Frost Carved Christmas Tree]] | |||
|3x6 | |||
|[[File:Culture.png|30px|Culture]] and [[File:Supply_small.png|30px|Supplies]] | |||
|[[File:Supply_small.png|30px|Supplies]] ----- [[File:Supply_small.png|30px|Supplies]] ----- [[File:Kpicon.png|30px|Knowledge Point]] ----- [[File:Kpicon.png|30px|Knowledge Point]]<br>or [[File:Gds3p1.png|30px|Magical Goods]] ----- [[File:Gds3p1.png|30px|Magical Goods]] ----- [[File:Kpicon.png|30px|Knowledge Point]] ----- [[File:Kpicon.png|30px|Knowledge Point]]<br>or [[File:Mana.png|30px|Mana]] ----- [[File:Mana.png|30px|Mana]] ----- [[File:Kpicon.png|30px|Knowledge Point]] ----- [[File:Kpicon.png|30px|Knowledge Point]] | |||
|- | |||
!colspan="4" | | |||
|- | |||
|colspan="4" style="text-aligh: center" |[[File:WinterSet2018_2.png|600px|Snow Owls Set]] | |||
Set 2: Snow Owls Set | |||
|- | |||
|colspan="1"|Building | |||
|colspan="1"|Size | |||
|colspan="1"|Benefits | |||
|colspan="1"|Set Bonus | |||
|- | |||
|[[File:Event_Win_Set2_2x4_0000.png|120px|Clocktower Owls]] | |||
|2x4 | |||
|[[File:Populationadd.png|25px|Population]] and [[File:Culture.png|30px|Culture]] and [[File:Coin_small.png|30px|Coins]] | |||
|[[File:Coin_small.png|30px|Coins]] ----- [[File:Kpicon.png|30px|Knowledge Point]] | |||
|- | |||
|[[File:Event_Win_Set2_5x2_0000.png|120px|Stable of the Snow Owl]] | |||
|5x2 | |||
|[[File:Populationadd.png|25px|Population]] and [[File:Culture.png|30px|Culture]] and [[File:Supply_small.png|30px|Supplies]]<br>or [[File:Gds3p1.png|30px|Magical Goods]]<br>or [[File:Mana.png|30px|Mana]] | |||
|[[File:Supply_small.png|30px|Supplies]] ----- [[File:Kpicon.png|30px|Knowledge Point]]<br>or [[File:Gds3p1.png|30px|Magical Goods]] ----- [[File:Kpicon.png|30px|Knowledge Point]]<br>or [[File:Mana.png|30px|Mana]] ----- [[File:Kpicon.png|30px|Knowledge Point]] | |||
|- | |||
|[[File:Event_Win_Set2_3x4_01_0000.png|120px|Yeti Santas Christmas Factory]] | |||
|3x4 | |||
|[[File:Populationadd.png|25px|Population]] and [[File:Culture.png|30px|Culture]] and [[File:Supply_small.png|30px|Supplies]]<br>or [[File:Gds3p1.png|30px|Magical Goods]]<br>or [[File:Mana.png|30px|Mana]]<br>or [[File:Seed_icon.png|30px|Divine Seeds]] | |||
|[[File:Supply_small.png|30px|Supplies]] ----- [[File:Kpicon.png|30px|Knowledge Point]]<br>or [[File:Gds3p1.png|30px|Magical Goods]] ----- [[File:Kpicon.png|30px|Knowledge Point]]<br>or [[File:Mana.png|30px|Mana]] ----- [[File:Kpicon.png|30px|Knowledge Point]]<br>or [[File:Seed_icon.png|30px|Divine Seeds]] ----- [[File:Kpicon.png|30px|Knowledge Point]] | |||
|- | |||
|} | |||
<br> | |||
{| style="text-align: center" class="mw-collapsible mw-collapsed" | |||
!colspan="11"|Carnival Building Set | |||
|- | |||
|colspan="4" style="text-align:center" |[[File:Evt_Car_XIX_Set.png|500px|Carnival Set]] | |||
Carnival Set | |||
|- | |||
|Building | |||
|colspan="1"|Size | |||
|colspan="1"|Benefits | |||
|colspan="1"|Set Bonus | |||
|- | |||
|[[File:Evt_Car_XIX_Tavern.png|80px|Jester’s Tavern]] | |||
|4x4 | |||
|[[File:Culture.png|25px|Culture]] and [[File:Good_elixir_small.png|Elixir]] | |||
|[[File:Good_magic_dust_small.png|Magic Dust]] ---- [[File:Good_gems_small.png|Gems]] ----- [[File:Kpicon.png|30px|Knowledge Points]] | |||
|- | |||
|[[File:Evt_Car_XIX_Band.png|80px|Marching Band]] | |||
|4x2 | |||
|[[File:Culture.png|25px|Culture]] and [[File:Supply_small.png|25px|Supplies]]<br>or [[File:Gds3p1.png|30px|Magical Goods]]<br>or [[File:Mana.png|30px|Mana]]<br>or [[File:Seed_icon.png|30px|Divine Seeds]] | |||
|[[File:Supply_small.png|25px|Supplies]] ----- [[File:Supply_small.png|25px|Supplies]]<br> or [[File:Gds3p1.png|30px|Magical Goods]] ----- [[File:Gds3p1.png|30px|Magical Goods]]<br> or [[File:Mana.png|30px|Mana]] ----- [[File:Mana.png|30px|Mana]]<br> or [[File:Seed_icon.png|30px|Divine Seeds]] ----- [[File:Seed_icon.png|30px|Divine Seeds]] | |||
|- | |||
|[[File:Evt_Car_XIX_Fountain.png|80px|Revelers Fountain]] | |||
|3x3 | |||
|[[File:Culture.png|25px|Culture]] and [[File:Supply_small.png|25px|Supplies]]<br>or [[File:Gds3p1.png|30px|Magical Goods]]<br>or [[File:Mana.png|30px|Mana]] | |||
|[[File:Supply_small.png|25px|Supplies]] ----- [[File:Supply_small.png|25px|Supplies]] ----- [[File:Supply_small.png|25px|Supplies]] ----- [[File:Supply_small.png|25px|Supplies]]<br> or [[File:Gds3p1.png|30px|Magical Goods]] ----- [[File:Gds3p1.png|30px|Magical Goods]] ----- [[File:Gds3p1.png|30px|Magical Goods]] ----- [[File:Gds3p1.png|30px|Magical Goods]]<br>or [[File:Mana.png|30px|Mana]] ----- [[File:Mana.png|30px|Mana]] ----- [[File:Mana.png|30px|Mana]] ----- [[File:Mana.png|30px|Mana]] | |||
|- | |||
|[[File:Evt_Car_XIX_Banquet.png|80px|Banquet]] | |||
|5x3 | |||
|[[File:Culture.png|25px|Culture]] and [[File:Supply_small.png|25px|Supplies]] | |||
|[[File:Supply_small.png|25px|Supplies]] ----- [[File:Brokenshard.png|30px|Broken Shard]] ----- [[File:Kpicon.png|30px|Knowledge Points]] | |||
|- | |||
|[[File:Evt_Car_XIX_Fireworks.png|80px|Festive Fireworks]] | |||
|2x3 | |||
|[[File:Culture.png|25px|Culture]] and [[File:Coin_small.png|30px|Coins]] | |||
|[[File:Coin_small.png|30px|Coins]] ----- [[File:Coin_small.png|30px|Coins]] | |||
|} | |||
<br> | |||
====Sada budov z Výroby==== | |||
<!-- This didn't seem to work? --> | |||
{| style="text-align: center" class="mw-collapsible mw-collapsed" | |||
!colspan="11"|Sada magického šachu | |||
|- | |||
|colspan="4" style="text-align:center" |[[File:Crafting_Set1.png|500px|Šachový sada]] | |||
Sada magického šachu | |||
|- | |||
|Budova | |||
|colspan="1"|Veľkosť | |||
|colspan="1"|Výhody | |||
|colspan="1"|Bonus sady | |||
|- | |||
|[[File:A_Evt_Set_A_ChessA.png|80px|Zlatý kráľ]] | |||
|2x3 | |||
|[[File:Culture.png|25px|Kultúra]] a [[File:Supply_small.png|25px|Zásoby]]<br>alebo [[File:Gds3.png|30px|Magický tovar]]<br>alebo [[File:Mana.png|30px|Mannna]] | |||
| | |||
[[File:Supply_small.png|25px|Zásoby]] ---- [[File:Supply_small.png|25px|Zásoby]] ----- [[File:Kpicon.png|30px|Vedomostné body]]<br>alebo | |||
[[File:Gds3.png|30px|Magický tovar]] ---- [[File:Gds3.png|30px|Magický tovar]] ----- [[File:Kpicon.png|30px|Vedomostné body]]<br>alebo | |||
[[File:Mana.png|30px|Manna]] ---- [[File:Mana.png|30px|Manna]] ----- [[File:Kpicon.png|30px|Vedomostné body]] | |||
|- | |||
|[[File:A_Evt_Set_A_ChessB.png|80px|Slnečná veža]] | |||
|1x4 | |||
|[[File:Culture.png|25px|Kultúra]] a [[File:Coin_small.png|30px|Mince]] | |||
|[[File:Coin_small.png|30px|Mince]] ----- [[File:Supply_small.png|25px|Zásoby]] | |||
|- | |||
|[[File:A_Evt_Set_A_ChessC.png|80px|Plamenný rytier]] | |||
|1x3 | |||
|[[File:Culture.png|25px|Kultúra]] a [[File:Supply_small.png|25px|Zásoby]]<br>alebo [[File:Gds3p1.png|30px|Magický tovar]]<br>alebo [[File:Mana.png|30px|Manna]]<br>alebo [[File:Seed_icon.png|30px|Božská úroda]] | |||
|[[File:Supply_small.png|25px|Zásoby]] ----- [[File:Supply_small.png|25px|Zásoby]]<br> alebo [[File:Gds3p1.png|30px|Magický tovar]] ----- [[File:Gds3p1.png|30px|Magický tovar]]<br> alebo [[File:Mana.png|30px|Manna]] ----- [[File:Mana.png|30px|Manna]]<br> alebo [[File:Seed_icon.png|30px|Božská úroda]] ----- [[File:Seed_icon.png|30px|Božská úroda]] | |||
|- | |||
|[[File:A_Evt_Set_A_ChessD.png|80px|Objemný opát]] | |||
|3x1 | |||
|[[File:Culture.png|25px|Kultúra]] a [[File:Supply_small.png|25px|Zásoby]] | |||
|[[File:Supply_small.png|25px|Zásoby]] ----- [[File:Coin_small.png|30px|Mince]] ----- [[File:Coin_small.png|30px|Mince]] | |||
|} | |||
Verzia z 20:02, 20. marec 2019

Sada Budov
Sada budov pozostáva z určitého počtu budov. Každá jedinečná sada budov môže patriť iba do jednej sady budov. Postavte ich hneď vedľa seba, aby ste zlepšili svoj skutočný potenciál! Čím viac unikátnych budov postavíte vedľa seba, tým vyšší bude ich bonus!
Môžete ich vyhrať počas udalostí. Napríklad štyri nové sady budov, ktoré sú súčasťou Zimného setu udalostí v roku 2017, sú označené indikátorom zimnej sady ![]() . Tieto informácie sa zobrazujú v popisoch nástrojov, keď sa pohybujete nad novými budovami. Keď sa aspoň dve budovy zo sady navzájom dotýkajú, zvýrazní sa indikátor zimnej sady
. Tieto informácie sa zobrazujú v popisoch nástrojov, keď sa pohybujete nad novými budovami. Keď sa aspoň dve budovy zo sady navzájom dotýkajú, zvýrazní sa indikátor zimnej sady ![]()
Pridaný bonus
Ak dáte budovy patriace do tej istej sady budovy priamo pri sebe, získate určité dodatočné bonusy, pretože tieto stavby majú stavebnú zručnosť. Keď je budova s nastaveným bonusom postavená hneď vedľa inej (inej) budovy z tejto konkrétnej sady, dostane bonus.
Napríklad, tu je bližší pohľad na Ľadový horský trol:


Ľadový horský trol je dodávaný so špeciálnym pridaným bonusom. Keď je v susedstve ostatných budov patriacich do sady Zimných udalostí, získajú osobitné bonusy. Ľadový horský trol normálne produkuje iba mince, ale keď sa dotýka ostatných budov z sady Zimných udalostí má:
- Produkuje dodatočné zásoby (pri dotyku aspoň jednej jedinečnej budovy).
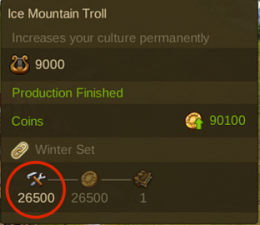
- Produkuje dodatočné mince (pri dotyku aspoň dvoch jedinečných budov).
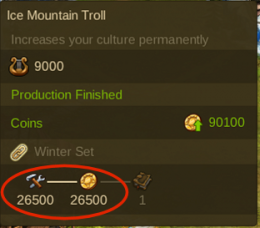
- Produkuje dodatočné Vedomostné body (pri dotyku aspoň troch jedinečných budov).
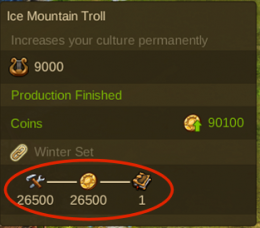


Bonusy sa zvyšujú, takže keď sa dotýkajú dvoch ďalších budov, dostanete bonus za oba 1 a 2. Podrobné sumy sa zobrazia v popisoch, keď sa pohybujete nad novými budovami.
Sada budov pripojená na hlavnú budovu
Každá budova sady môže slúžiť ako portál / konektor pre ostatné budovy, ktoré sú súčasťou tej istej sady. Pripojte ho k hlavnej budove s ulicou a umiestnite svoje zostavené budovy vedľa nej. Všetky nastavené budovy budú potom mať prepojenie ulicou.
- Jedna sada budovy musí byť pripojená k ulici.
- Pripojená sada budov môže slúžiť ako prepojenie pre všetky priľahlé budovy tejto sady.
Príklad prepojenia sady budov:


Building Sets Overview
A Building Set is composed of a certain number of buildings. Any unique Set Building can only belong to one Building Set. Build them right next to each other to unlock their true potential! The more unique Set Buildings you build next to each other, the higher their bonus will be! To view a bigger image, click on the building picture.
| Three Glacier Giants Building Set | ||||||||||
|---|---|---|---|---|---|---|---|---|---|---|
| Building | Size | Benefits | Set Bonus | |||||||
|
|
5x4 | |||||||||

|
2x4 | or
| ||||||||

|
4x3 | |||||||||

|
2x3 | or
| ||||||||
| The Phoenix Cult Building Set | ||||||||||
|---|---|---|---|---|---|---|---|---|---|---|
| Building | Size | Benefits | Set Bonus | |||||||

|
2x3 | |||||||||

|
3x5 | |||||||||

|
5x3 | |||||||||

|
2x3 | |||||||||

|
2x2 | |||||||||
| The Woodelvenstock Building Set | ||||||||||
|---|---|---|---|---|---|---|---|---|---|---|
| Building | Size | Benefits | Set Bonus | |||||||

|
2x2 | |||||||||

|
3x1 | or |
or | |||||||

|
3x4 | or or or |
or or or | |||||||

|
2x3 | |||||||||
| 3x3 | ||||||||||
| The Harvest Festival Building Set 1 and 2 | |||
|---|---|---|---|

Set 1: Harvest Temple | |||
| Building | Size | Benefits | Set Bonus |

|
2x6 | ||

|
2x6 | ||

|
3x1 | ||

|
3x3 | ||

|
3x2 | ||

Set 2: Shrines of Sun and Moon | |||
| Building | Size | Benefits | Set Bonus |

|
5x3 | ||

|
4x4 | ||

|
1x1 | or or |
or or |

|
1x1 | or or |
or or |
| The Winter Magic Set 1 and 2 | |||
|---|---|---|---|

Set 1: Winter Market Set | |||
| Building | Size | Benefits | Set Bonus |

|
2x3 | ||

|
2x4 | ||

|
3x2 | ||

|
3x3 | ||

|
3x6 | or or | |

Set 2: Snow Owls Set | |||
| Building | Size | Benefits | Set Bonus |

|
2x4 | ||

|
5x2 | or or |
or or |

|
3x4 | or or or |
or or or |
| Carnival Building Set | ||||||||||
|---|---|---|---|---|---|---|---|---|---|---|

Carnival Set | ||||||||||
| Building | Size | Benefits | Set Bonus | |||||||

|
4x4 | |||||||||

|
4x2 | or or or |
or or or | |||||||

|
3x3 | or or |
or or | |||||||

|
5x3 | |||||||||

|
2x3 | |||||||||
Sada budov z Výroby
| Sada magického šachu | ||||||||||
|---|---|---|---|---|---|---|---|---|---|---|

Sada magického šachu | ||||||||||
| Budova | Veľkosť | Výhody | Bonus sady | |||||||

|
2x3 | alebo alebo |
| |||||||

|
1x4 | |||||||||

|
1x3 | alebo alebo alebo |
alebo alebo alebo | |||||||

|
3x1 | |||||||||